5. Database
database is a component, which provides persistence features to the Flopsar environment.
5.1. Configuration
database is configured in its configuration file <database_home>/conf/flopsar.conf. The file contains the following options:
- agent.bind.address
- Socket address of a TCP server, which receives agents data (see Fig. 5.2).
- ui.bind.address
- Socket address of a TCP server, which handles fdbc requests (see Fig. 5.2). Every workstation client connects to this socket automatically.
- ui.rdr.address
- Socket address all workstation clients should connect to instead of ui.bind.address. If not specified, the ui.bind.address value will be taken. This feature is useful, when your workstation clients are outside database network and are unable to connect to it directly.
- name
- Database instance label. You can name your database instance by setting this option. If not specifed, it will take your machine hostname as its name.
- manager.address
- manager socket address. You must set this option value to your manager TCP server address, which should be consistent with server.bind.* options from manager configuration.
- archive.enable
- Enables/disables the data archiving feature. It can take one of the two values: true or false.
- archive.schedule.time
- Sets the time of day to start the data archiving procedure. This option is ignored if the archive option is set to false. It takes the value in the form HH:MM, where HH denotes an hour (0-23) and MM denotes minutes (0-59). If, for example, you want the procedure to start every day at 5:20, you just need to set this option as follows archive.schedule.time=5:20.
- archive.base.retention
- Sets the number of hours the base data should be archived if they are older than the specified hours value. See Data Archiving for details.
- archive.ext.retention
- Sets the number of hours the ext data should be archived if they are older than the specified hours value. See Data Archiving for details.
- archive.retention.policy
- Sets the data archiving policy. It can take one of the two values: archive or purge. If the latter value is set, then the procedure will remove all the data that would be archived in the former case. In other words, if you want to keep your database volume size under control and you are not interested in archiving old data, you just need to set archive.retention.policy=purge. Otherwise, you must use archive value.
5.2. Logging
There is a single log file flopsar.db.log for database. It is stored in database_home/logs directory. The logging levels are defined in Logging section.
You can set the logger level either during the startup procedure or in runtime. For example, to set the fine level during database startup use the following options:
$ fs2db start --loglevel fine <database_home>
In order to change it in runtime, execute the following command:
$ fs2db set --loglevel fine <database_home>
Warning
Database log file is not rolled over, so you must control its size.
5.2.1. Logger messages
Each logger message entry has the following structure:
DATE [LEVEL][PID] Message content
or
DATE [LEVEL][PID][PLG] Message content
The only difference between these two types is an additional PLG entry. This entry denotes that this particular message comes from a plugin. The rest of the entries denote:
| DATE: | current date. |
|---|---|
| LEVEL: | current logger level. |
| PID: | system process ID number of the logging process. |
| Message content: | |
| is self-explanatory. | |
5.3. Database Management
You can monitor a database instance health by dumping various statistics. These statistics include collectors subsystem states and others. You can dump the statistics on the console by executing the following command:
$ fs2db get --target database-stats <database_home>
The output Fig. 5.5 consists of collectors and overall statistics. Each collector is a matrix, whose rows represent 5-minute slots and columns 1-hour slots. When a call arrives its collector cell must be found. When the cell is found, it is appended to its execution stack and stays there until its root call arrives. Then the entire execution stack is removed from the collector. Collectors are combined into workers, which manage the collectors. Each worker has its own queue of incoming calls to process. The numbers in cells show how many execution stacks (root calls) are being collected.
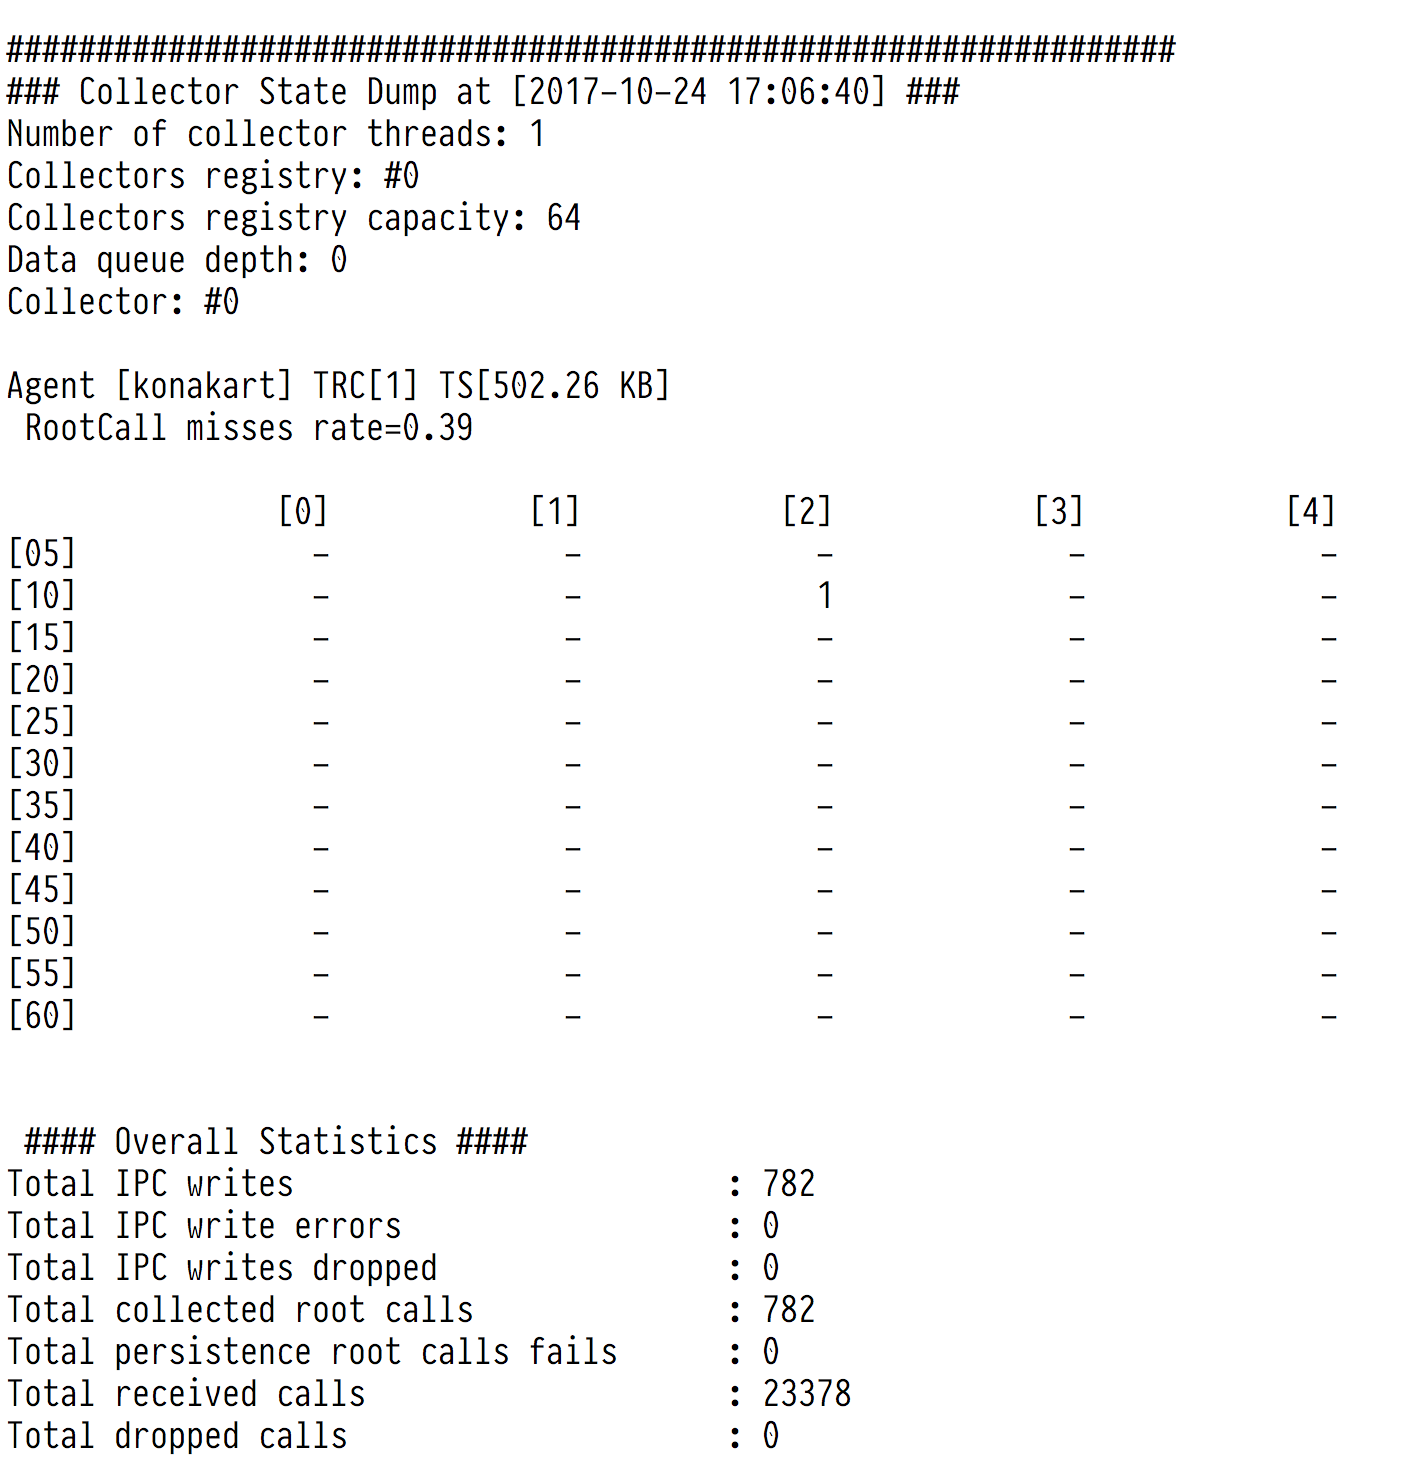
Fig. 5.5 Flopsar database Statistics Dump
For each worker, there are three metrics, which give information about its state:
| Collectors registry: | |
|---|---|
| index of the worker. | |
| Collectors registry capacity: | |
| number of collectors. | |
| Data queue depth: | |
| worker’s queue depth. | |
For each collector, there are two metrics, which give information about the collector state:
| TRC: | Total Root Calls: the number of root calls being collected. |
|---|---|
| TS: | Total Size: the total size of the collector. |
The overall statistics (covering all the available collectors) contain the following information:
| Number of collector threads: | |
|---|---|
| total number of collecting threads (workers). Each thread can handle multiple collectors. | |
| Total IPC writes: | |
| total number of root calls transferred to the FPU process successfully. | |
| Total IPC write errors: | |
| total number of failures in transferring root calls to the FPU process due to write error. | |
| Total IPC writes dropped: | |
| total number of failures in transferring root calls to the FPU process due to thread contention. | |
| Total collected root calls: | |
| total number of root calls collected and removed from their collectors. | |
| Total persistence root calls fails: | |
| total number of root calls, which have not been persisted. If this value is greater than zero, investigate the database logs. | |
| Total received calls: | |
| total number of calls, received by collectors. | |
| Total dropped calls: | |
| total number of dropped calls. A call is dropped when it is corrupted. | |
5.4. Storage
If you want to inspect your database storage, just execute the following command:
$ fs2db get --target storage-stats <database_home>
You should get a similar result:
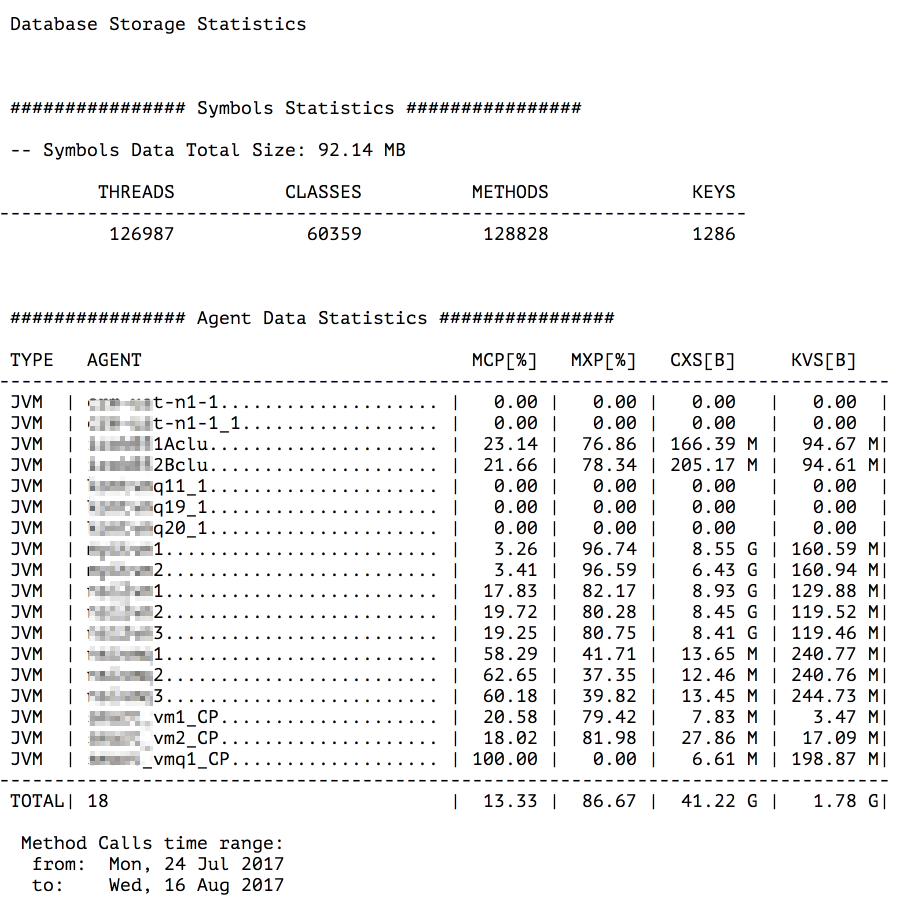
Fig. 5.6 Database Storage Statistics
This view contains both symbols and agent data statistics. For symbols, it presents a total number of threads, class names, method names and keys. For agent data a little more statistics is available. A table of all agents is presented where columns denote:
- TYPE
- Type of agent.
- AGENT
- Agent name.
- MCP
- Method calls percentage. This value shows percentage share method calls data in CXS.
- MXP
- Method extensions (parameters and exceptions stack traces) percentage. This value shows percentage share method extensions data in CXS.
- CXS
- Method calls and extensions size.
- KVS
- Key-value data size.
5.4.1. Data Archiving
Data archiving is a feature, which helps you to keep your database volume under control. If enabled, it runs every day at the scheduled time, compresses part of the data and moves the compressed data to the <database_home>/storage/arch directory. After this operation, your database volume is smaller. There are a few configuration options, which govern this procedure, the ones with prefix archive.
First of all, in order to enable the archive feature, you must set archive.enable=true option in the configuration file. To make the archiving procedure start at the HH:MM time, you must set the option archive.schedule.time=HH:MM. When the time comes, the database master process spawns a new archive process, which does the archiving. When the archiving procedure starts, it must know which data it should archive. This is managed by two, additional options:
archive.base.retention
archive.ext.retention
We distinguish two tiers of data to archive: base and ext. The latter covers all the extensions data, which are parameters and exceptions stack traces, while the former covers the remaining data. First, the procedure archives the ext data which are older than the specified number of hours of the archive.ext.retention option. Next, it archives the rest of the data, which are older than the specified number of hours of the archive.base.retention option. The idea standing behind these tiers of data is to keep the base data a little longer than parameters and exceptions. This imposes a condition on the values of these retention options, namely:
archive.base.retention >= archive.ext.retention
The procedure always produces a single file. The file is stored in the directory <database_home>/storage/arch and its name is of the form fs2.arch-YYYY-MM-DD_HHMM, where YYYY-MM-DD_HHMM is a date time of the procedure beginning. Besides the output file, there is a log file fs2.arch-YYYY-MM-DD_HHMM.log created in the same directory. The log file contains some information about the archiving operation.
If you want to only keep your database volume under control and you are not interested in old data, then you can set the option archive.retention.policy=purge. This policy makes the database delete the old data.
5.4.2. Database Dump
If you want to dump all your database data to a single file, you can do it by executing the following command:
$ fs2db start --action database-dump <database_home>
This command will dump and compress all the data. The result will be stored in a single file <database_name>_YYYY-MM-DD_HHMM.arch. Additionally, a log file is also created <database_name>_YYYY-MM-DD_HHMM.arch.log.
Note
Database dump should be executed when the database instance is not running.
If you want to specify a time range for the dump, you must add two extra options:
$ fs2db start --action database-dump --from YYYY-MM-dd --to YYYY-MM-dd <database_home>
The above command will dump only those data, which are within the specified time range.
If you want to dump the data only for some selected agents, you must add another option, e.g.:
$ fs2db start --action database-dump --from YYYY-MM-dd --to YYYY-MM-dd --agents agent1,agent2,agent3 <database_home>
The above command will dump the data only from the specified agents. Agent names must be separated with a comma.
5.4.3. Extraction
If you want to extract the archived file, you just need to execute the following command:
$ fs2db start --action database-extract <arch>
This command will extract the specified <arch> file in the current working directory. A new storage directory will be created with extracted database data. Additionally, a log file fs2-arch-extract.log will be stored with extraction procedure logs. Optionally, you can set the logger level, for example:
$ fs2db start --loglevel fine --action database-extract <arch>